Linux 下安装 Elasticsearch
#编程技术 2019-10-30 14:10:23 | 全文 1111 字,阅读约需 3 分钟 | 加载中... 次浏览👋 相关阅读
- windows10 安装 ElasticSearch
- centos服务器安装rclone自动挂载无限容量谷歌相册Google photo为磁盘
- mysql 已有大数据量表进行分区踩坑
- Python 连接 Oracle 数据库时遇到的坑及解决办法
- 使用Instantbox快速搭建一个开箱即用的Web端临时Linux系统

说明
Elasticsearch 就不过多介绍了,可以自行百度或者查看上一篇文章《windows10安装ElasticSearch》
下载
- 可以自行登陆网站手动下载:https://www.elastic.co/cn/downloads/elasticsearch
- Linux 下使用 wget 下载
wget https://artifacts.elastic.co/downloads/elasticsearch/elasticsearch-5.6.3.tar.gz根据需求自行替换版本号
安装
1、cd 到安装目录,执行解压命令
tar -zxvf elasticsearch-5.6.3.tar.gz
修改配置文件
1、进入 elasticsearch 安装目录,使用vi编辑器
vi config/elasticsearch.yml
2、取消如下注释,并修改为当前主机地址:
network.host: 192.168.0.3
discovery.zen.ping.unicast.hosts: ["192.168.0.3"]
3、使用vi编辑器,修改 /etc/sysctl.conf 文件,添加如下代码(若无将会出现下面常见问题2):
vm.max_map_count=262144
4、退出保存后执行如下命令:
sysctl -p
新建 elsearch 用户及用户组
[root@localhost ~]## groupadd elsearch

[root@localhost ~]## useradd elsearch -g elsearch -p elasticsearch

[root@localhost ~]## passwd elsearch ## 设置密码

[root@localhost ~]## cd /usr/local/  ## 进入 elsearch 安装目录

[root@localhost /usr/local]## chown -R elsearch:elsearch elasticsearch-5.5.2/ ## 授权
使用vi编辑器,修改 /etc/security/limits.conf 文件,在文件末尾添加如下代码(若无将会出现下面常见问题3):
elsearch soft nofile 65536

elsearch hard nofile 65536

elsearch soft nproc 4096

elsearch hard nproc 4096

baoshan soft memlock unlimited

baoshan hard memlock unlimited
修改 90-nproc.conf 配置:
vim /etc/security/limits.d/90-nproc.conf

elsearch soft nproc 2048
注意: elsearch 为登录的用户名,因为 root 在 5.0.0 之后是不能启动 elasticsearch。需要退出重新登录,配置才能生效
启动 ElasticSearch 及查看状态
启动ElasticSearch服务的命令,显示启动的log:
su elsearch
cd elsearch安装目录
./bin/elasticsearch
加上-d参数表示后台启动,一般我们都采用后台启动的方式:
su elsearch
cd elsearch安装目录
./bin/elasticsearch -d
ElasticSearch服务启动成功后,可看到如下进程信息:
ps -es |grep elasticsearch
查看ElasticSearch服务所监听的端口:
netstat -lntp |grep java
设置防火墙规则,开放 ElasticSearch 服务所监听的端口:
[elsearch@localhost elasticsearch-5.6.3]$ sudo firewall-cmd --zone=public --add-port=9200/tcp --permanent success [elsearch@localhost elasticsearch-5.6.3]$ sudo firewall-cmd --zone=public --add-port=9300/tcp --permanent success [elsearch@localhost elasticsearch-5.6.3]$ sudo firewall-cmd --reload success
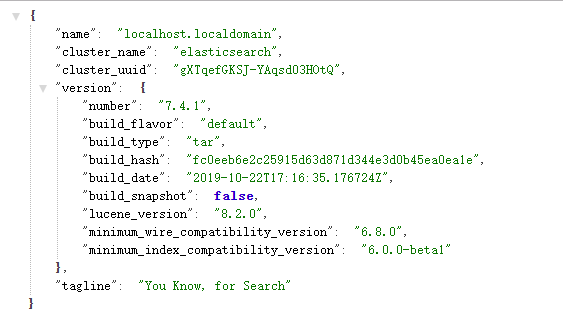
开放了相应的端口(9200)后,从浏览器中访问,看看能否访问成功,如下则是访问成功的:
常见问题
1、can not run elasticsearch as root
Elasticsearch版本> = 5.0.0时,是不可用超级管理员运行Elasticsearch的,退出管理员账号即可
2、max virutal memory areas vm.max_map_count [65530] is too low, increase to at least [262144]
解决方案,请看上面修改配置文件
3、max number of threads [3750] for user [xxx] is too low, increase to at least [4096]
解决方案,请看上面修改新建用户及用户组
4、memory locking requested for elasticsearch process but memory is not locked
解决办法如下:需要修改/etc/security/limits.conf 添加以下命令:
elsearch soft memlock unlimited

elsearch hard memlock unlimited
elsearch 为启动 elasticsearch 的用户名
修改:/etc/sysctl.conf 添加 -> vm.swappiness=0
5、Native controller process has stopped - no new native processes can be started 解决办法:
vi /etc/security/limits.conf
在文件的末尾加上

esyonghu soft nofile 65536
esyonghu hard nofile 65536
esyonghu soft nproc 4096
esyonghu hard nproc 4096


进入到下面文件夹
[root@localhost ~]## cd /etc/security/limits.d
[root@localhost limits.d]## ll
total 4
-rw-r--r--. 1 root root 191 Nov  6  2016 20-nproc.conf


[root@localhost limits.d]## vi 20-nproc.conf

## Default limit for number of user's processes to prevent
## accidental fork bombs.
## See rhbz #432903 for reasoning.

*          soft    nproc     4096
root       soft    nproc     unlimited
~
~
将上面内容的*号改成用户名


## See rhbz #432903 for reasoning.

elsearch   soft    nproc     4096
root       soft    nproc     unlimited


修改下面文件加上内容
[root@localhost security]## vi /etc/sysctl.conf
vm.max_map_count = 655360


对于上面的内容让其生效
[root@localhost security]## sysctl -p
vm.max_map_count = 655360